스프링부트에 Oauth2.0 설정을 한번 해보자.
spring.io에 상세하게 나와 있으니 아래 주소를 참조하기 바란다.
참조 : spring.io/guides/tutorials/spring-boot-oauth2/
Spring Boot and OAuth2
this tutorial is designed to be completed in 2-3 hours, it provides deeper, in-context explorations of enterprise application development topics, leaving you ready to implement real-world solutions.
spring.io
Oauth는 신뢰할수 있는 제3자가 인증을 대신 해주는 방식이다. 웹서비스를 구축할때 인증도 같이 개발을 하지만, 인증을 구현하는것은 그렇게 간단한 일은 아니다. 그래서 Oauth는 신뢰할수 있는 인증제공자(google, facebook, github 등)의 인증서비스를 이용하는 방식이다.
사용자는 이용하려는 웹서비스에서 계정을 생성하지 않고, 이미 가입되어 있는 인증제공자에게 인증을 요청하고 결과로 인증토큰을 받아서 해당 토큰이 있으면 인증이 필요한 웹서비스를 이용할수 있다.
대략적인 개념은 이렇고 더 자세히 알아보려면 다음 주소를 참조해보고, 인터넷으로 정보를 확인하기 바란다.
RFC 6749 - The OAuth 2.0 Authorization Framework
[Docs] [txt|pdf] [draft-ietf-oaut...] [Tracker] [Diff1] [Diff2] [IPR] [Errata] Updated by: 8252 PROPOSED STANDARD Errata Exist Internet Engineering Task Force (IETF) D. Hardt, Ed. Request for Comments: 6749 Microsoft Obsoletes: 5849 October 2012 Category:
tools.ietf.org
그럼 스프링 부트에서 Github를 이용해서 인증을 구현해보겠다.
먼저 스프링 부트 프로젝트를 생성한다.
여기서는 intellij를 사용한다.
intellij에서 New > Project 을 선택한다.
New Project 창에서 Spring Initializer을 선택한다.
Next버튼을 클릭한다.
Project 정보를 맞게 셋팅한다. (type은 gradle을 선택한다.)
의존성은 spring web을 선택한다.
프로젝트 생성을 완료한다.
어플리케이션을 실행하고 에러없이 로그가 보이면 정상적으로 프로젝트가 생성이 된것이다.
리소스에 index.html파일을 작성한다.
resource/static에 생성한다.
<!doctype html>
<html lang="en">
<head>
    <meta charset="utf-8"/>
    <meta http-equiv="X-UA-Compatible" content="IE=edge"/>
    <title>Demo</title>
    <meta name="description" content=""/>
    <meta name="viewport" content="width=device-width"/>
    <base href="/"/>
    <link rel="stylesheet" type="text/css" href="/webjars/bootstrap/css/bootstrap.min.css"/>
    <script type="text/javascript" src="/webjars/jquery/jquery.min.js"></script>
    <script type="text/javascript" src="/webjars/bootstrap/js/bootstrap.min.js"></script>
</head>
<body>
	<h1>Demo</h1>
	<div class="container"></div>
</body>
</html>
localhost:8080에 접속해서 다음문구가 뜨면 된다.

build.gradle 파일에 의존성을 추가한다.
spring-boot-starter-oauth2-client, webjars-jquery, webjars-bootstrap, webjars-webjars-locator-core, webjars-js-cookie를 gradle의존성을 설정한다
plugins {
    id 'org.springframework.boot' version '2.4.3'
    id 'io.spring.dependency-management' version '1.0.11.RELEASE'
    id 'java'
}

group = 'com.example'
version = '0.0.1-SNAPSHOT'
sourceCompatibility = '11'

repositories {
    mavenCentral()
}

dependencies {
    implementation 'org.springframework.boot:spring-boot-starter-web'
    testImplementation 'org.springframework.boot:spring-boot-starter-test'

    // https://mvnrepository.com/artifact/org.springframework.boot/spring-boot-starter-oauth2-client
    implementation group: 'org.springframework.boot', name: 'spring-boot-starter-oauth2-client', version: '2.4.3'

    // https://mvnrepository.com/artifact/org.webjars/jquery
    implementation group: 'org.webjars', name: 'jquery', version: '3.5.1'

    // https://mvnrepository.com/artifact/org.webjars/bootstrap
    implementation group: 'org.webjars', name: 'bootstrap', version: '4.6.0'

    // https://mvnrepository.com/artifact/org.webjars/webjars-locator-core
    implementation group: 'org.webjars', name: 'webjars-locator-core', version: '0.46'

    // https://mvnrepository.com/artifact/org.webjars/js-cookie
    implementation group: 'org.webjars', name: 'js-cookie', version: '2.1.0'

}

test {
    useJUnitPlatform()
}
Github에 새 앱을 생성한다.
github.com/settings/developers
GitHub: Where the world builds software
GitHub is where over 56 million developers shape the future of software, together. Contribute to the open source community, manage your Git repositories, review code like a pro, track bugs and feat...
github.com
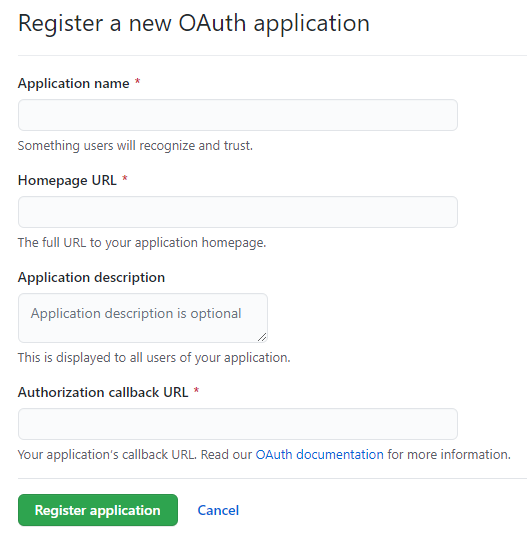
Application name : app 이름을 짓는다.
Homepage Url : localhost:8080
Application description: app에 대한 설명을 입력한다.
Authorization callback URL : 인증결과를 받는 콜백주소를 입력한다. 여기서는
http://localhost:8080/login/oauth2/code/github이 주소를 사용한다. 아래와 같은 주소형식을 사용한다.
{baseUrl}/login/oauth2/code/{registrationId}registrationId는 유일해야 한다.
Client ID와 Client Secret를 application.yml에 설정한다.
spring:
  security:
    oauth2:
      client:
        registration:
          github:
            clientId: github-client-id
            clientSecret: github-client-secret
# ...
github에 생성한 app화면에서 cliend id와, client secret를 입력한다.
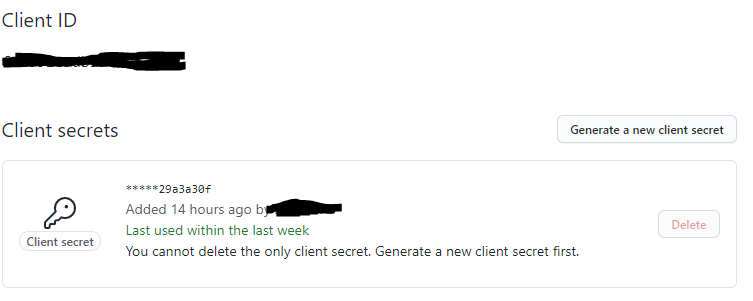
Generate a new client secret를 클릭해서 생성된 값을 입력하면 된다. 처음 생성시에만 볼수 있으니 잘 복사해두어야 한다.
Index.html 파일을 다시 작성한다.
index.html 파일에는 로그인링크, 로그인후 이름표시, 로그아웃 버튼으로 구성되어 있다.
<!doctype html>
<html lang="en">
<head>
    <meta charset="utf-8"/>
    <meta http-equiv="X-UA-Compatible" content="IE=edge"/>
    <title>Demo</title>
    <meta name="description" content=""/>
    <meta name="viewport" content="width=device-width"/>
    <base href="/"/>
    <link rel="stylesheet" type="text/css" href="/webjars/bootstrap/css/bootstrap.min.css"/>
    <script type="text/javascript" src="/webjars/jquery/jquery.min.js"></script>
    <script type="text/javascript" src="/webjars/bootstrap/js/bootstrap.min.js"></script>
    <script type="text/javascript" src="/webjars/js-cookie/js.cookie.js"></script>
    <script type="text/javascript">
        $
            .ajaxSetup({
                beforeSend : function(xhr, settings) {
                    if (settings.type == 'POST' || settings.type == 'PUT'
                        || settings.type == 'DELETE') {
                        if (!(/^http:.*/.test(settings.url) || /^https:.*/
                            .test(settings.url))) {
                            // Only send the token to relative URLs i.e. locally.
                            xhr.setRequestHeader("X-XSRF-TOKEN",
                                Cookies.get('XSRF-TOKEN'));
                        }
                    }
                }
            });

        $.get("/user", function(data){
            $("#user").html(data.name);
            $(".unauthenticated").hide();
            $(".authenticated").show()
        })

        var logout = function() {
            $.post("/logout", function() {
                $("#user").html('');
                $(".unauthenticated").show();
                $(".authenticated").hide();
            })
            return true;
        }
    </script>
</head>
<body>
<h1>Demo</h1>
<div class="container unauthenticated">
    With GitHub: <a href="/oauth2/authorization/github">click here</a>
</div>
<div class="container authenticated" style="display:none">
    Logged in as: <span id="user"></span>
    <div>
        <button onClick="logout()" class="btn btn-primary">Logout</button>
    </div>
</div>

</body>
</html>
Application파일을 작성한다.
/user 엔트포인트를 추가한다.
스프링 시큐리티 설정을 한다.
package com.example.oauth2.tutorial;

import org.springframework.boot.SpringApplication;
import org.springframework.boot.autoconfigure.SpringBootApplication;
import org.springframework.http.HttpStatus;
import org.springframework.security.config.annotation.web.builders.HttpSecurity;
import org.springframework.security.config.annotation.web.configuration.WebSecurityConfigurerAdapter;
import org.springframework.security.core.annotation.AuthenticationPrincipal;
import org.springframework.security.oauth2.core.user.OAuth2User;
import org.springframework.security.web.authentication.HttpStatusEntryPoint;
import org.springframework.security.web.csrf.CookieCsrfTokenRepository;
import org.springframework.web.bind.annotation.GetMapping;
import org.springframework.web.bind.annotation.RestController;

import java.util.Collection;
import java.util.Collections;
import java.util.Map;

@SpringBootApplication
@RestController
public class SpringbootOauth2TutorialApplication extends WebSecurityConfigurerAdapter {

    @GetMapping("/user")
    public Map<String, Object> user(@AuthenticationPrincipal OAuth2User principal) {
        return Collections.singletonMap("name", principal.getAttribute("name"));
    }

    @Override
    protected void configure(HttpSecurity http) throws Exception {
        // @formatter:off
        http
                .authorizeRequests(a -> a
                        .antMatchers("/", "/error", "/webjars/**").permitAll()
                        .anyRequest().authenticated()
                )
                .exceptionHandling(e -> e
                        .authenticationEntryPoint(new HttpStatusEntryPoint(HttpStatus.UNAUTHORIZED))
                )
                .logout(l -> l
                        .logoutSuccessUrl("/").permitAll()
                )
                .csrf(c -> c
                        .csrfTokenRepository(CookieCsrfTokenRepository.withHttpOnlyFalse())
                )
                .oauth2Login()
        ;

        // @formatter:on
    }

    public static void main(String[] args) {
        SpringApplication.run(SpringbootOauth2TutorialApplication.class, args);
    }

}
어플리케이션을 실행하면 아래와 같이 화면이 뜨고 click을 하면 인증이 된다.
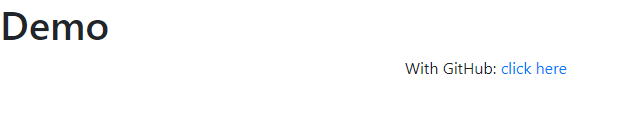
인증이 되고 나면 사용자 이름이 보여지고 logout를 클릭하면 다시 위의 화면으로 보여진다.

'웹개발 > 스프링부트' 카테고리의 다른 글
| Springboot Exception Handling(스프링부트 exception 핸들링) (0) | 2021.03.10 |
|---|---|
| 스프링 부트에 H2 DB 적용하기 (0) | 2021.03.03 |
| 스프링부트 api응답을 json으로 하기 (0) | 2021.02.18 |
| 스프링부트 CORS 적용하기 (0) | 2021.02.17 |
| IntelliJ 스프링 부트 Hellow world 프로젝트 만들기 (0) | 2021.02.16 |

