스프링 시큐리티에서 제공하는 기본 로그인을 알아보자
1. 프로젝트 생성
프로젝트는 다음과 같이 생성한다.

2. 서버를 실행
서버를 실행하고 localhost:8080으로 접속한다. 그러면 로그인 페이지가 바로 나온다. spring-security가 자동으로 생성해주는 로그인 페이지이다.

username은 user
password는 로그에서 찾아본다. 다음그림과 같이

usernam과 password를 입력하고 로그인을 하면 빈 에러 페이지가 나온다.

3. index.html 작성
resources/templates아래에 index.html 작성한다.
<!DOCTYPE html>
<html lang="en">
<head>
    <meta charset="UTF-8">
    <title>Title</title>
</head>
<body>
<h1>Hello World!</h1>
</body>
</html>
서버를 다시 시작한다. 로그인을 하면 인덱스 페이지가 나온다.

4. 로그레벨 debug로 수정
로그를 더 상세하게 보기 위해서 application.yml파일을 만들고 다음과 같이 작성한다.
server:
  port: 8080

logging:
  level:
    root: debug
5. Configuration , Filter
SpringBootWebSecurityConfiguration
프로젝트를 생성하고 스프링 시큐리티 관련 설정을 하지 않았지만, 서버기동시에 자동으로 스프링 시큐리티 관련 설정이 적용되고 웹페이지에 접속시 로그인 페이지로 이동하게 된다. springboot에서 자동으로 설정을 해주는데 스프링시큐리티의 설정도 마찬가지로 사용자가 설정한 내용이 없는경우 다음과 같이 자동으로 생성이 된다.
@Configuration(proxyBeanMethods = false)
@ConditionalOnDefaultWebSecurity
@ConditionalOnWebApplication(type = Type.SERVLET)
class SpringBootWebSecurityConfiguration {

	@Bean
	@Order(SecurityProperties.BASIC_AUTH_ORDER)
	SecurityFilterChain defaultSecurityFilterChain(HttpSecurity http) throws Exception {
		http.authorizeRequests().anyRequest().authenticated().and().formLogin().and().httpBasic();
		return http.build();
	}

}
FilterChainProxy
스프링 시큐리티는 인증과 권한체크를 서블릿 필터기반으로 처리를 한다. 그래서 스프링 시큐리티를 사용하는 경우에는 스프링부트에서 FilterChainProxy를 서블릿 필터에 추가하여 기본 스프링시큐리티 설정에 맞게 처리를 해준다.

SecurityFilterChain
FilterChainProxy 필터는 doFilter 메서드를 실행시에 다시 SecurityFilterChain이라는 스프링시큐리티 필터리스트를 가지고 있는 필터에게 인증처리를 위임한다. 기본적으로 생성된 필터들은 다음과 같다.

인덱스 페이지에 접근시에 위의 15개 필터를 거쳐서 지금 유저가 접근이 가능한지를 체크해서 접근 권한이 없는경우 로그인페이지로 이동을 시키며 로그인페이지는 DefaultLoginPageGenerationFilter에서 자동으로 페이지를 만들어준다.
6. index페이지 접속
FilterSecurityInterceptor, ExceptionTranslationFilter
localhost:8080 호출시 index.html파일을 불러오는데 스프링시큐리티 설정에 의해 FilterSecurityInterceptor에서 접근권한이 없다고 판단하면 AccessDeniedException을 던진다. 그러면 ExceptionTranslationFilter에서 AccessDeniedException인지 체크를 하고 error url로 리다이렉팅하는데, 이때 로그인한 유저인지, 로그인을 하지않은 anonymouse유저인지 체크를 해서 로그인을 하지 않은 유저인경우 /login으로 리다이렉팅을 한다. 로그인한 유저일경우에는 403에러를 발생시킨다.
그런데 여기어 어떻게 자동으로 /login페이지로 이동시키는지 궁금해서 알아보았다. 스프링시큐리티에서 시작시 기본적으로 설정을 자동으로 하는 Configurer들이 있는데 지금은 form기반 로그인이기 때문에 FormLoginConfigurer이용해서 설정을 하는데 이클래스는 AbstractAuthenticationFilterConfigurer을 상속받은 클래스이다. AbstractAuthenticationFilterConfigurer의 생성자에서 다음과 같은 로그인 페이지가 셋팅이되고
	/**
	 * Creates a new instance with minimal defaults
	 */
	protected AbstractAuthenticationFilterConfigurer() {
		setLoginPage("/login");
	}
ExceptionTranslatorFilter에서 AccessDeniedException이 발생하면 아래 코드가 실행이되며 현재 유저는 로그인을 하지 않았기 때문에 isAnonymous가 true 가되어 if문이 실행되면 sendStartAuthenticaion() 메서드를 실행한다.

ExceptionTranslationFilter에 authenticationEntryPoint변수에는 LoginUrlAuthenticationEntryPoint가 저장이 되어 있으며 this.authenticationEntryPoint.commence()메서드를 실행한다.

LoginUrlAuthenticationEntryPoint의 commence를 실행하면 this.useForward가 false이므로 if(!this.useForward)문을 실행하고 redirectUrl은 /login이므로 this.redirectStrategy.sendRedirect()를 실행하면 헤더에 location이 /login으로 설정되고 /login 으로 이동하게 된다.

7. 인증(Authentication) 프로세스
로그인을 하게되면 기본적으로 위에 정의된 15개의 필터를 모두 거친다. 이렇게 여러 필터들을 거치다가 UsernamePasswordAuthenticationFilter가 상속받은 부모 클래스(AbstractAuthenticationProcessingFilter)의 doFilter()메서드에서 인증이 필요한지 체크하는 requiresAuthentication()메소드에서 true를 반환하면 로그인 프로세스를 시작하게 된다. 여기서 false를 반환하면 이필터는 건너뛰게 된다. 여기서는 url이 '/login' 이면 사용자가 로그인 정보를 입력했다고 생각하고 로그인 프로세스를 시작하게 되는것이다..

그러먼 UsernamePasswordAuthenticationFilter의 attemptAuthentication 메서드를 실행한다. 그러면 username, password를 가져와서 UsernamePasswordAuthenticationToken(Authentication의 구현체)을 생성하고 AuthenticationManager의 authenticate메서드를 실행한다. 여기서 AuthenticationManger의 구현체이 ProviderManager의 authenticate 메서드를 실행하게 된다.

this.getAuthenticationManager().authenticate() 메서드를 실행하면 ProviderManager의 authenticate를 실행하게 되고 제공된 AuthenticationProvider의 리스트를 가져와서 제공된 provider의 authenticate메서드를 실행한다. 여기서는 DaoAuthenticationProvider가 인증을 수행하게 된다.
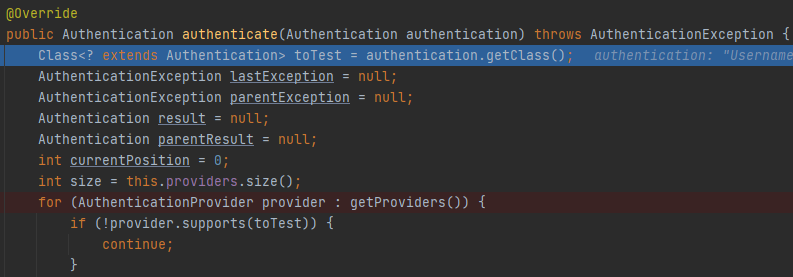
AbstractUserDetailsAuthenticationProvider의 authentication()메서드를 실행한다.
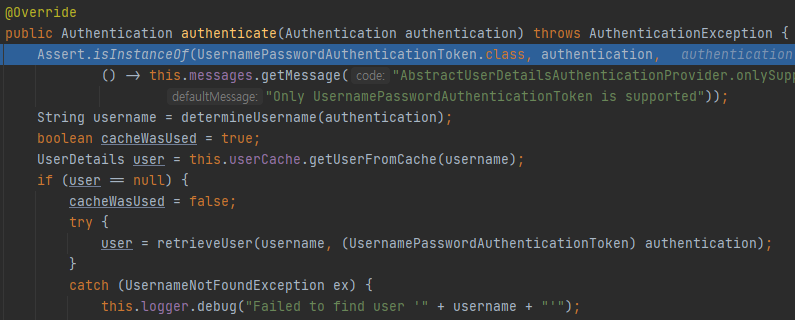
DaoAuthenticationProvider의 retrieveUser() 메서드를 실행한다.
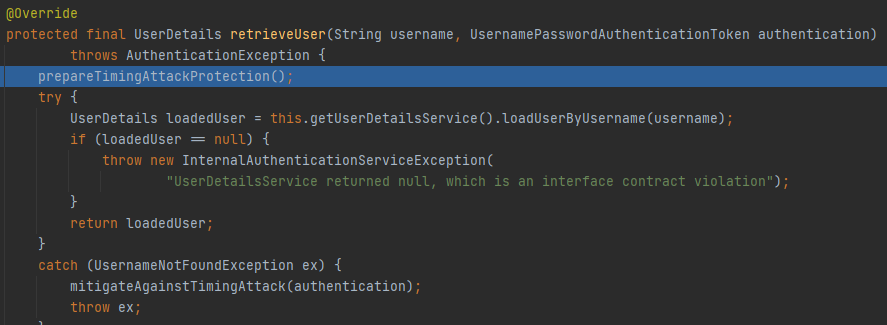
UserDetailsService의 상속받은 UserDetailManager를 구현한 InMemoryUserDetailManager의 loadUserByUsername()메서드를 실행해서 UserDetails를 반환한다.
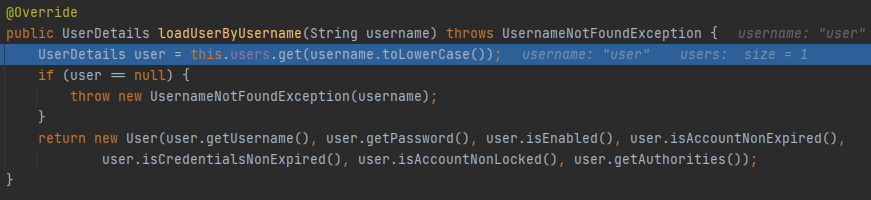
DaoAuthenticationProvider에서 추가로 비밀번호 검증을 한다.

위 코드의 순서를 시퀀스 다이어그램으로 정리를 해봤다.

8. 권한부여(Authority) 프로세스
FilterSecurityInterceptor에서 권한 체크를 시작한다. doFilter() 메서드에서 invoke()메서드에 FilterInvocation 클래스를 파라메타로 넘긴다. FilterInvocation 클래스는 Http 필터와 관련된 Object들을 보관한다. request, response는 HttpServletRequest, HttpServletResponse객체이고, 널객체가 없음을 보장한다. 보안시스템클래스가 request, response와 필터 환경에 대한 접근을 얻을 수 있게 필요한 클래스이다.
Holds objects associated with a HTTP filter.
Guarantees the request and response are instances of HttpServletRequest and HttpServletResponse, and that there are no null objects.
Required so that security system classes can obtain access to the filter environment, as well as the request and response.

invoke()메서드안에서 super.beforeInvocation()를 호출한다. 메서드를 실행한다.
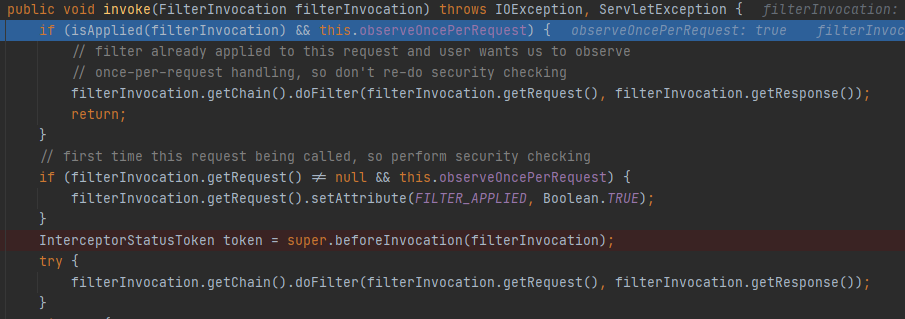
beforeInvocation()메서드로 Object파라메터로 넘어오는데 이 object는 FilterInvocation 클래스이다. 이클래스는 호출하는 웹페이지에 대한 request,response를 가지고 있고 FilterChain도 가지고 있다. 이 FilterInvocation클래스에서 ConfigAttribute 리스트를 가져온다. 그리고 attemptAuthorization()메서드에 FilterInvocation, ConfigAttribute 리스트, Authentication 파라메터 3개인 인자로 넘긴다.

이제 접근 권한을 체크하기 위해 attemptAuthorization()메서드의 this.accessDecisionManager.decide() 메서드를 호출하고 넘겨받은 3개의 파라메터도 같이 넘겨준다.

AccessDecisionManager의 구현체인 AffirmativeBase(접근권한이 하나라도 있으면 권한부여되는 클래스)가 기본 구현체가 되고 이클래스에서 접근권한을 결정하기위해 voter의 리스트를 가지고 있는데 반복문을 실행하면서 리스트에 있는 voter의 vote메소드를 호출하여 에 접근권한이 있는지 확인한다. 접근권한이 있으면 ACCESS_GRANTED상수를 리턴하고 ACCESS_DENIED인경우 deny를 카운트하여 0보다 큰경우 AccessDeniedException을 던진다.

getDecisionVoters()메서드를 호출하여 voter리스트를 가져온다.

voter 리스트에는 1개의 voter이 있고 WebExpressionVoter 이다

Voter를 별로로 셋팅하지 않았다면 기본 보터는 WebExpressionVoter 클래스 이다. 이Voter는 표현식을 참조하여 권한에 대한 접근을 허용하는 Voter이다. vote메서드는 findConfigAttribute() 메소드를 실행해서 파마메타로 넘어온 attributes에서 WebExpressionConfigAttribute의 인스턴스인 attribute를 반환받는다. 그리고 반환받은 attribute.postProcess() 메서드를 호출하여 EvalutionContext를 반환받고, EpresssionUtils.eveluateAsBoolean()메소드에 attirbute의 권한표현식과 EvalutionContex를 파라메타로 넘겨서 권한을 체크하여 권한상수값을 반환 받는다.

vote() 메서드에서 리턴되는 값에 따라 ACCESS_GRANTED(1), ACCESS_ABSTAIN(0), ACCESS_DENIED(-1)을 리턴한다.
정리
지금 까지 기본설정인 스프링 시큐리티 프로세스를 대략적으로 살펴보았다.
정리를 한번 해보면
스프링 기본설정의 경우 자동으로 보안설정이 되고, 자동 설정에 따라서 모든 url 접근에 인증이 있어야 되며, 로그인페이지는 자동으로 생성이 된다. 그리고 로그인의 경우 UsernamePasswordAuthenticationFilter에서 처리가 되며, 권한부여는 FilterSecurityInterceptor에서 처리가 된다. 로그인 실패의 경우 AuthenticationException을 던지며, 권한이 없는 경우 AccessDeniedException을 던진다. 던져진 Exception에 따라서 ExceptionTranslationFilter가 판단을 하여 로그인페이지로보거나 403페이지로 보낸다.
'웹개발 > 스프링시큐리티' 카테고리의 다른 글
| 5. 스프링 시큐리티 - Remember Me 기능 구현 (0) | 2021.04.19 |
|---|---|
| 4. 스프링 시큐리티 - 회원가입 (0) | 2021.04.19 |
| 3. 스프링 시큐리티 - h2base 적용하기 (0) | 2021.04.17 |
| 2. 스프링시큐리티 - 로그인 페이지 변경 (1) | 2021.04.15 |
| 스프링 시큐리티에서 중요한 컴포넌트들 (0) | 2021.04.04 |


